Make Your Android TV App Remotely Configurable!
Stop Losing Trial Users: Automate Setup and Maximize Conversions.🌞
Stop losing trial users to setup frustration! Our solution dramatically Boosts Conversions and guarantees 5-Star Reviews by eliminating the biggest barrier: manual data entry. Enable your users to fully configure your app with a single, instant click from their phone or PC, slashing negative feedback and reducing your overall support load.
How It Works for Your End Users
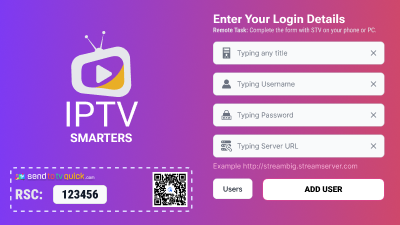
Typing the RSCode
The user views a dedicated setup screen on the TV (Your App) displaying a unique Remote Shot Code (RSC), and then simply inputs that RSC code into the Smartago Tool on their Phone/PC.

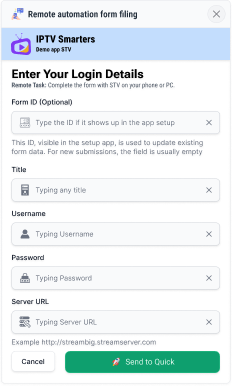
User Input Step
On their Phone/PC, the user is presented with an exact mirrored copy of the form currently displayed on your TV App. They quickly fill in all the required fields on the remote device and then click ‘Send’ to complete the process.”

Data Transfer & Automation
Our background service running on the Android TV receives the user’s input and sends it directly to your app via a Deep Link, which then allows your app to automatically fill the form and proceed with the configuration.

Data Quality and Validation
The STV app performs data validation pre-send. On request, we can also validate the streaming server’s response and implement any other custom checks you need before final submission
What You Need to Integrate
Getting Your Codes and Form Ready
First, go to your developer account and create a new app integration.
Integrate the Deep Link Listener
This step requires writing a very small amount of code.
The code for this is simple, and the time needed from you is minimal.
Launch and Promotion
This step requires writing a very small amount of code.
INTEGRATION EXAMPLES
Integration Example (Java for Android)
// ***************************************************************
// SMARTAGO: DEEP LINK INTEGRATION EXAMPLE (JAVA)
// ***************************************************************
// This Java Activity shows how to receive and process the data
// sent by the user’s Smartago Tool (via Phone/PC).
// ***************************************************************
import android.app.Activity;
import android.content.Intent;
import android.net.Uri;
import android.os.Bundle;
import android.util.Log;
import androidx.annotation.Nullable;
// Note: In older Android versions, androidx.annotation might not be needed.
public class SmartagoDeepLinkActivity extends Activity {
private static final String TAG = “SmartagoSetup”;
@Override
protected void onCreate(@Nullable Bundle savedInstanceState) {
super.onCreate(savedInstanceState);
// Place your Activity layout or UI code here (if applicable)
// Check the Intent when the Activity is created
handleIntent(getIntent());
}
@Override
protected void onNewIntent(Intent intent) {
super.onNewIntent(intent);
// Check the Intent if the Activity is already running
handleIntent(intent);
}
private void handleIntent(Intent intent) {
// Ensure the Intent action is a VIEW action, which is used for Deep Links
if (intent == null || !Intent.ACTION_VIEW.equals(intent.getAction())) {
Log.d(TAG, “No valid Deep Link Intent detected.”);
return;
}
// 1. Receive the full URI (Deep Link)
Uri data = intent.getData();
if (data != null) {
// The expected Deep Link structure: your-app-scheme://smartago/config?user=xxx&pass=yyy&url=zzz
Log.i(TAG, “Deep Link received: ” + data.toString());
// 2. Reading (Parsing) the parameters (Query Parameters)
// Smartago sends data as key-value pairs
String username = data.getQueryParameter(“username”);
String password = data.getQueryParameter(“password”);
String providerUrl = data.getQueryParameter(“provider_url”);
String taskId = data.getQueryParameter(“task_id”); // The 4th digit (e.g., 1)
Log.i(TAG, “TASK ID (4th digit): ” + taskId);
Log.i(TAG, “Username: ” + username);
Log.i(TAG, “Password: ” + password);
Log.i(TAG, “Provider URL: ” + providerUrl);
// 3. Filling the Form (Automation)
if (username != null && password != null && providerUrl != null) {
// **************************************************
// THIS IS THE CRITICAL POINT:
// INSERT YOUR JAVA CODE TO AUTOMATICALLY FILL
// YOUR APP’S FORM FIELDS (e.g., EditTexts) HERE.
// **************************************************
// Example:
// usernameField.setText(username);
// passwordField.setText(password);
// urlField.setText(providerUrl);
Log.w(TAG, “— Setup data received and form filled successfully! —“);
// You can now proceed automatically:
// startLoginProcess();
} else {
Log.e(TAG, “Error: Missing essential configuration parameters.”);
}
}
}
}
// NOTE: You must still configure your AndroidManifest.xml file to declare
// the deep link scheme (e.g., <data android:scheme=”your-app-scheme”… />)
Integration Example (Capacitor/JS)
// ***************************************************************
// SMARTAGO: DEEP LINK INTEGRATION EXAMPLE (CAPACITOR/JAVASCRIPT)
// ***************************************************************
// This code runs in your web view environment and listens for the
// ‘appUrlOpen’ event triggered by the Capacitor App plugin when a
// Deep Link is activated.
// ***************************************************************
import { App } from ‘@capacitor/app’;
document.addEventListener(‘DOMContentLoaded’, () => {
console.log(“Capacitor App Ready. Starting Deep Link listener…”);
// The main function to handle the URL when the app is opened via a link
App.addListener(‘appUrlOpen’, (data) => {
handleDeepLink(data.url);
});
// Handle the Deep Link if the app was started via the link (initial load)
handleInitialLoad();
});
// A helper function to check for the initial deep link
const handleInitialLoad = () => {
// In Capacitor, the initial URL is typically handled by the ‘appUrlOpen’ listener.
// If you use other routing methods, you might check window.location.href here.
// For simplicity, we rely on the standard ‘appUrlOpen’ event.
}
const handleDeepLink = (url) => {
if (!url || !url.includes(“smartago”)) {
console.log(“URL does not contain expected Smartago configuration path.”);
return;
}
try {
// 1. Receive the full URI (Deep Link)
const deepLinkUri = new URL(url);
console.log(“Deep Link received:”, deepLinkUri.href);
// 2. Reading (Parsing) the parameters
// The Deep Link structure: your-app-scheme://smartago/config?user=xxx&pass=yyy&url=zzz
const username = deepLinkUri.searchParams.get(“username”);
const password = deepLinkUri.searchParams.get(“password”);
const providerUrl = deepLinkUri.searchParams.get(“provider_url”);
const taskId = deepLinkUri.searchParams.get(“task_id”);
console.log(“TASK ID (4th digit):”, taskId);
console.log(“Username:”, username);
console.log(“Password:”, password);
console.log(“Provider URL:”, providerUrl);
// 3. Filling the Form (Automation)
if (username && password && providerUrl) {
// **************************************************
// THIS IS THE CRITICAL POINT:
// JAVASCRIPT CODE TO FILL IN YOUR FORM FIELDS
// **************************************************
// Example using a hypothetical form element:
// document.getElementById(‘username-input’).value = username;
// document.getElementById(‘password-input’).value = password;
// document.getElementById(‘url-input’).value = providerUrl;
console.warn(“— The form was filled successfully! —“);
// Example: Automatically submit the form or navigate:
// submitConfiguration();
} else {
console.error(“Missing essential parameters for configuration.”);
}
} catch (e) {
console.error(“Error parsing Deep Link URL:”, e);
}
}
// NOTE: Remember to install the ‘@capacitor/app’ plugin and configure
// the URL Scheme in your capacitor.config.ts/js file.
Integration Example (Flutter/Dart)
// ***************************************************************
// SMARTAGO: DEEP LINK INTEGRATION EXAMPLE (FLUTTER/DART)
// ***************************************************************
// This code demonstrates how your Flutter application listens for,
// receives, and parses the configuration data sent via Deep Link.
// This structure is ideal for cross-platform Android TV apps.
// (Assumes a package like ‘uni_links’ or platform channel is used
// to get the incoming link, here simulated by calling _handleDeepLink).
// ***************************************************************
import ‘package:flutter/material.dart’;
void main() {
runApp(const MyApp());
}
class MyApp extends StatelessWidget {
const MyApp({super.key});
@override
Widget build(BuildContext context) {
return MaterialApp(
title: ‘Smartago Flutter Config’,
theme: ThemeData(primarySwatch: Colors.blue),
home: const ConfigurationScreen(),
);
}
}
class ConfigurationScreen extends StatefulWidget {
const ConfigurationScreen({super.key});
@override
State<ConfigurationScreen> createState() => _ConfigurationScreenState();
}
class _ConfigurationScreenState extends State<ConfigurationScreen> {
// State variables to show the form data received
String _statusMessage = “Waiting for Deep Link setup…”;
String _username = ”;
String _password = ”;
String _providerUrl = ”;
String _taskId = ”;
@override
void initState() {
super.initState();
// In a real app, you would set up listeners here:
// 1. Get the initial Deep Link (if the app was opened by the link)
// 2. Set up a stream listener for new Deep Links (if the app is already running)
// *** SIMULATION: Calling the handler with a mock Deep Link ***
// Replace this call with your actual uni_links listener implementation
Future.delayed(const Duration(seconds: 2), () {
const mockUrl = “your-app-scheme://smartago/config?username=testuser&password=secure123&provider_url=http://provider.url/list.m3u&task_id=1”;
_handleDeepLink(mockUrl);
});
}
void _handleDeepLink(String url) {
if (!url.contains(“smartago”)) {
setState(() {
_statusMessage = “Error: URL does not contain Smartago path.”;
});
return;
}
try {
// 1. Parse the full URI (Deep Link) using Dart’s Uri class
final deepLinkUri = Uri.parse(url);
print(“Deep Link received: ${deepLinkUri.toString()}”);
// 2. Reading (Parsing) the parameters
// Use queryParametersAll or queryParameters map
final params = deepLinkUri.queryParameters;
final username = params[‘username’];
final password = params[‘password’];
final providerUrl = params[‘provider_url’];
final taskId = params[‘task_id’];
// 3. Filling the Form (Automation) – Update State
if (username != null && password != null && providerUrl != null) {
setState(() {
_username = username;
_password = password;
_providerUrl = providerUrl;
_taskId = taskId ?? ‘N/A’;
_statusMessage = “Setup data received and form filled successfully!”;
});
// **************************************************
// THIS IS THE CRITICAL POINT:
// Your code here to update form controllers or submit automatically.
// **************************************************
} else {
setState(() {
_statusMessage = “Error: Missing essential configuration parameters.”;
});
}
} catch (e) {
setState(() {
_statusMessage = “Error parsing Deep Link: $e”;
});
}
}
@override
Widget build(BuildContext context) {
return Scaffold(
appBar: AppBar(title: const Text(‘Smartago Remote Configuration’)),
body: Center(
child: Padding(
padding: const EdgeInsets.all(32.0),
child: Column(
mainAxisAlignment: MainAxisAlignment.center,
crossAxisAlignment: CrossAxisAlignment.start,
children: <Widget>[
// Status Message Area
Text(
_statusMessage,
style: const TextStyle(fontSize: 18, fontWeight: FontWeight.bold),
textAlign: TextAlign.center,
),
const SizedBox(height: 40),
// Received Data Display (Simulated Form Fields)
const Text(“— RECEIVED DATA —“, style: TextStyle(fontWeight: FontWeight.w600)),
const Divider(),
_buildDataRow(‘Username:’, _username),
_buildDataRow(‘Password:’, _password.replaceAll(RegExp(r’.’), ‘*’)), // Masking password
_buildDataRow(‘Provider URL:’, _providerUrl),
_buildDataRow(‘Task ID (4th digit):’, _taskId),
const SizedBox(height: 40),
if (_username.isNotEmpty)
ElevatedButton(
onPressed: () {
// This simulates the automatic submission after data transfer
setState(() {
_statusMessage = “Login process started automatically!”;
});
},
style: ElevatedButton.styleFrom(
backgroundColor: Colors.green,
padding: const EdgeInsets.symmetric(horizontal: 40, vertical: 15),
),
child: const Text(‘Proceed to Login’, style: TextStyle(fontSize: 18)),
),
],
),
),
),
);
}
// Helper widget to display data clearly
Widget _buildDataRow(String label, String value) {
return Padding(
padding: const EdgeInsets.symmetric(vertical: 8.0),
child: Row(
mainAxisAlignment: MainAxisAlignment.spaceBetween,
children: [
Text(label, style: const TextStyle(fontWeight: FontWeight.w500)),
Flexible(child: Text(value, overflow: TextOverflow.ellipsis)),
],
),
);
}
}
Integration Example (KOTLIN)
// ***************************************************************
// SMARTAGO: DEEP LINK INTEGRATION EXAMPLE (KOTLIN)
// ***************************************************************
// This Kotlin Activity shows how to safely receive and process
// the configuration data sent by the Smartago Remote Tool.
// ***************************************************************
import android.app.Activity
import android.content.Intent
import android.net.Uri
import android.os.Bundle
import android.util.Log
class SmartagoDeepLinkActivity : Activity() {
private val TAG = “SmartagoSetup”
override fun onCreate(savedInstanceState: Bundle?) {
super.onCreate(savedInstanceState)
// Place your Activity layout or UI code here
// Check the Intent when the Activity is created
// We use ‘intent’ which is always available in an Activity.
intent?.let { handleIntent(it) }
}
override fun onNewIntent(intent: Intent?) {
super.onNewIntent(intent)
// Check the Intent if the Activity is already running
intent?.let { handleIntent(it) }
}
private fun handleIntent(intent: Intent) {
// Ensure the Intent action is a VIEW action, which is used for Deep Links
if (intent.action != Intent.ACTION_VIEW) {
Log.d(TAG, “No valid Deep Link Intent detected.”)
return
}
// 1. Receive the full URI (Deep Link)
val data: Uri? = intent.data
data?.let { uri ->
// The expected Deep Link structure: your-app-scheme://smartago/config?user=xxx&pass=yyy&url=zzz
Log.i(TAG, “Deep Link received: $uri”)
// 2. Reading (Parsing) the parameters (Query Parameters)
// Smartago sends data as key-value pairs
val username = uri.getQueryParameter(“username”)
val password = uri.getQueryParameter(“password”)
val providerUrl = uri.getQueryParameter(“provider_url”)
val taskId = uri.getQueryParameter(“task_id”) // The 4th digit (e.g., 1)
Log.i(TAG, “TASK ID (4th digit): $taskId”)
Log.i(TAG, “Username: $username”)
// Note: Password should usually not be logged in production!
Log.i(TAG, “Provider URL: $providerUrl”)
// 3. Filling the Form (Automation)
// Use the safe call operator to check if all required parameters are present
if (username != null && password != null && providerUrl != null) {
// **************************************************
// THIS IS THE CRITICAL POINT:
// INSERT YOUR KOTLIN CODE TO AUTOMATICALLY FILL
// YOUR APP’S FORM FIELDS (e.g., EditTexts) HERE.
// **************************************************
// Example:
// usernameField.setText(username)
// passwordField.setText(password)
// urlField.setText(providerUrl)
Log.w(TAG, “— Setup data received and form filled successfully! —“)
// You can now proceed automatically:
// startLoginProcess()
} else {
Log.e(TAG, “Error: Missing essential configuration parameters.”)
}
} ?: run {
Log.d(TAG, “Deep Link URI was null.”)
}
}
}
// NOTE: You must still configure your AndroidManifest.xml file to declare
// the deep link scheme (e.g., <data android:scheme=”your-app-scheme”… />)